TrillaBit Integration Flow
Overview
The TrillaBit QI platform facilitates integrations through UI as well as API's. Through these methods you will be able to manage the Users, Domains, Accounts and Roles.
Definitions
User - A user within the QI platform. Each user must have a unique email address which is used as their username. A user's access is managed through the roles assigned to them.
Account - An account is a general grouping that can be used to manage users. It could be used to group users by client.
Domain - A domain is the top-level (of your) organization that will be managing the different accounts. Users that have domain-leve access can see data/users across all accounts.
User Group - A user group allows you to group users under a common name so that you can more easily manage that group of users. A typical use-case for a user group is the ability to share access to a particular dashboard without having to share with each individual user.
Roles - A role manages what access a user has, both in terms of data as well as access in the UI. Roles are assigned to users and each user can have multiple roles.
Common Roles
- DOMAIN ADMIN - This role gives you access to administer company-wide settings and manage datasets, accounts, users, roles and user groups. Dashboard management is also possible.
- ACCOUNT ADMIN - This roles gives you access to administer account-level settings and manage datasets, accounts, users, roles and user groups ONLY within the accounts you have access to. Dashboard management is also possible.
- REGULAR - This roles gives you access to create dashboards and view dashboards shared with you. Every user in the system has at least the REGULAR role.
Onboarding Flow
Typically, as a new client, you will want to manage the creation of users, their roles, as well as provide access to the QI system. Every user must have a user account in the system. The way to manage users via the API is as follows:
* Initial Setup
1. You are securely given the admin user who will have the highest level of permissions. This user typically has the role of "DOMAIN ADMIN". With this user you can log in to the system through the UI but if you'd like to manage the system via API's then you would use the credentials to login to the system using the LoginAPI. Once you have successfully logged in, you will receive a JWT token which can be used for all other API calls in the system.
- Login API Request
Example using "curl" in the command line:
curl -X POST https://api.trillabit.com:8000/login \
-H "Content-Type: application/json" \
-H "X-Requested-With: XMLHttpRequest" \
-d '{"username": "[email protected]", "password": "complexPassword!"}'
Example using JavaScript (Fetch API)
fetch('https://api.trillabit.com:8000/login', {
    method: 'POST',
    headers: {'Content-Type': 'application/json', 'X-Requested-With': 'XMLHttpRequest'},
    body: JSON.stringify({username: '[email protected]', password: 'complexPassword!'}),
})
    .then((response) => response.json())
    .then((data) => console.log(data))
    .catch((error) => console.error('Error:', error));
- Login API Response
If successful, the response will look like:
{"token": "eyadfgadf...", "refreshToken": "eyzsfgadf..."}
2. Use the token for creating accounts. If you already have an existing account that you'd like to add users to you can skip it his step. If you'd like to create a new account to put users in, create an account like this:
- Create Account API Request
- The {your_jwt_token} should be replaced with the token from step 1.
Example using "curl" in the command line:
curl -X POST "https://api.trillabit.com:8000/api/analytics/account" \
-H "Content-Type: application/json" \
-H "Authorization: Bearer <your_jwt_token>" \
-d '{
    "accountName": "new_account",
    "accountDescription": "new_account_desc",
    "organizationKeyValue": "200"
}'
Example using JavaScript (Fetch API)
fetch('https://api.trillabit.com:8000/api/analytics/account', {
    method: 'POST',
    headers: {
        'Content-Type': 'application/json',

        Authorization: 'Bearer <your_jwt_token>',
    },
    body: JSON.stringify({
        accountName: 'new_account',
        accountDescription: 'new_account_desc',
        organizationKeyValue: '200',
    }),
})
    .then((response) => response.json())
    .then((data) => console.log(data))
    .catch((error) => console.error('Error:', error));
- Create Account API Response
{
    "accountID": "fcf652e2-15b8-11ee-be56-0242ac120002"
}
3. Use the token from step 1 to create additional users. Create your users like this:
- Create User API Request
- The {your_jwt_token} should be replaced with the token from step 1.
Request Fields
- userName → Should be a valid email address associated with the user
- firstName
- lastName
- accountPhone (Optional)
- userID (Optional) : UUID → In case you want to use the userId from your system; otherwise, don't pass it
- roles: [ "Role1" , "Role2" ] → Can be existing or new roles. Any roles that don't exist in the system will be automatically created and assigned to the user
Example using "curl" in the command line:
curl -X POST "https://api.trillabit.com:8000/api/analytics/user" \
-H "Content-Type: application/json" \
-H "Authorization: Bearer <your_jwt_token>" \
-d '{
    "userID": "e20ede86-15b8-11ee-be56-0242ac120002",
    "userName": "[email protected]",
    "firstName": "John",
    "lastName": "Smith",
    "accountPhone": "321-321-3211",
    "roles": ["Role1", "Role2"]
}'
Example using JavaScript (Fetch API)
fetch('https://api.trillabit.com:8000/api/analytics/user', {
    method: 'POST',
    headers: {
        'Content-Type': 'application/json',
        Authorization: 'Bearer <your_jwt_token>',
    },
    body: JSON.stringify({
        userID: 'e20ede86-15b8-11ee-be56-0242ac120002',
        userName: '[email protected]',
        firstName: 'John',
        lastName: 'Smith',
        accountPhone: '321-321-3211',
        roles: ['Role1', 'Role2'],
    }),
})
    .then((response) => response.json())
    .then((data) => console.log(data))
    .catch((error) => console.error('Error:', error));
- Create User API Response
If successful, the response will look like:
{
    "membershipID": "11eff452-0000-0000-0000-0242ac120005",
    "userID": "11eff452-0000-0000-0000-0242ac120005"
}
We would suggest saving this response for later use as you will need it to log the user in to the system in the future.
4. Once you have created a dashboard through the UI, you may want to share it with a user. Using your token from step 1, you can share it with a user like this:
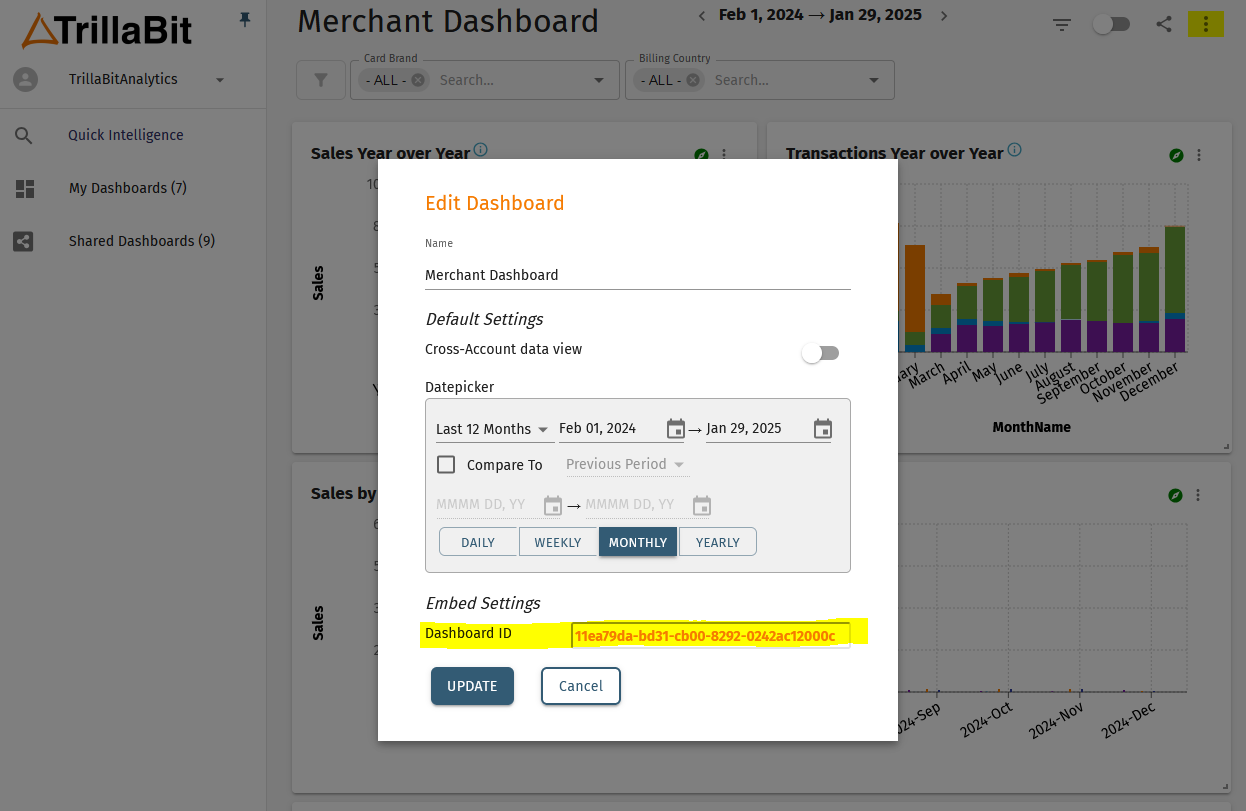
a. Get the dashboard ID of the dashboard you want to share through logging in to the UI, selecting the dashboard from the left sidebar, clicking the three dots in the top right, navigating to the edit mode and copying the dashboard ID.
OR
b. You can get a list of all dashboards through the dashboard API and find the one you want to share like this:
- List My Dashboards API Request
- The {your_jwt_token} should be replaced with the token from step 1.
Example using "curl" in the command line:
curl -X GET "https://api.trillabit.com:8000/api/analytics/UserSharedDashboard/SharedWithMe" \
-H "Authorization: Bearer <your_jwt_token>"
Example using JavaScript (Fetch API)
fetch('https://api.trillabit.com:8000/api/analytics/UserSharedDashboard/SharedWithMe', {
    method: 'GET',
    headers: {
        Authorization: 'Bearer <your_jwt_token>',
    },
})
    .then((response) => response.json())
    .then((data) => console.log(data))
    .catch((error) => console.error('Error:', error));
- List My Dashboards API Response
If successful, the response will look like:
[
    {
        "userSharedDashboardID": "d64eb3f0-15b8-11ee-be56-0242ac120002",
        "accountID": "fcf652e2-15b8-11ee-be56-0242ac120002",
        "dashboardID": "1d230a92-15b9-11ee-be56-0242ac120002",
        "user": null,
        "dashboard": {
            "dashboardName": "My Dashboard",
            "dashboardDescription": "My Dashboard"
        }
    }
]
Now that you have the dashboard ID, you can share the dashboard with a user like this:
- Share Dashboard with User API Request
- The {your_jwt_token} should be replaced with the token from step 1.
Example using "curl" in the command line:
curl -X POST "https://api.trillabit.com:8000/api/analytics/UserSharedDashboard" \
-H "Content-Type: application/json" \
-H "Authorization: Bearer <your_jwt_token>" \
-d '{
    "userID": "e20ede86-15b8-11ee-be56-0242ac120002",
    "dashboardID": "1d230a92-15b9-11ee-be56-0242ac120002"
}'
Example using JavaScript (Fetch API)
fetch('https://api.trillabit.com:8000/api/analytics/UserSharedDashboard', {
    method: 'POST',
    headers: {
        'Content-Type': 'application/json',
        Authorization: 'Bearer <your_jwt_token>',
    },
    body: JSON.stringify({
        userID: 'e20ede86-15b8-11ee-be56-0242ac120002',
        dashboardID: '1d230a92-15b9-11ee-be56-0242ac120002',
    }),
})
    .then((response) => response.json())
    .then((data) => console.log(data))
    .catch((error) => console.error('Error:', error));
- Share Dashboard with User API Response
{
    "userSharedDashboardID": "d64eb3f0-0000-11ee-be56-0242ac120002"
}
* Logging In Users
5. Now that you have users, you will need to log them in to the platform so they can see their dashboards. This is done is by:
a. Generating a JWT for the user using their details obtained from [here].(#--create-user-api-response)
b. Setting the JWT to the iframe in your application and the user will be automatically logged in to the QI platform.
*** Note: you will need to have a signing key and sign your JWT, more details here ***
For additional API's please refer to the TrillaBit Embedding and APIs