TrillaBit Embedding and APIs
Embedding
The method of embedding Quick Intelligence (QI) into your product is currently through an iframe. You can integrate the QI platform into any web-based application by adding an iframe in the desired location and setting the iframe URL.
Quick-Start Guide
To get familiar with the parameters and see it in action, we have created a test harness you can download below to see the QI platform embedded in a sample html page. There are two query string parameters that are available for integration.
- "t" - A JWT token that is used for authentication with the platform
- "d" - A dashboard ID that will navigate the user directly to a specific dashboard
** Before downloading ensure you have a login to the QI platform that you can use as well as a dashboard ID to test with **
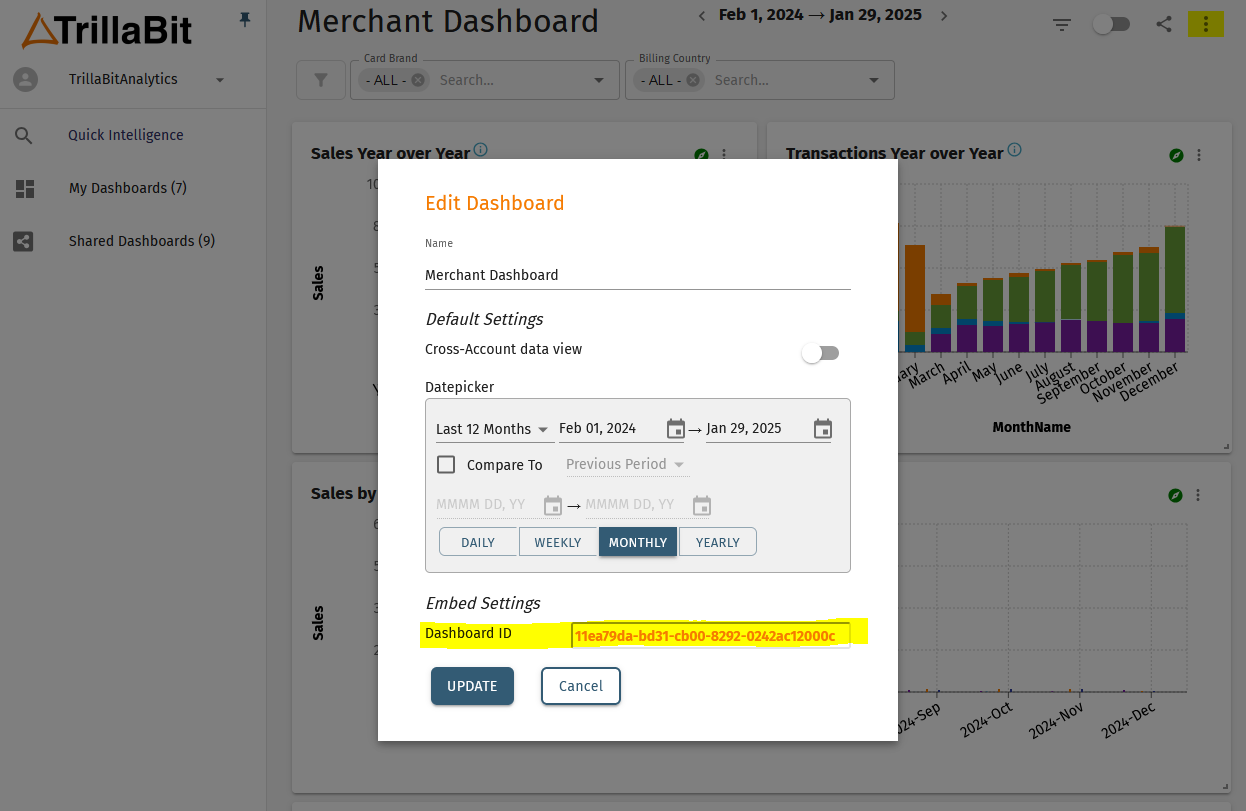
You can find the dashboard ID from within the platform when you edit an existing dashboard or call the API for a list of all dashboards associated to the logged in user.
Embedding Flow
- A user with enough permissions to create additional users is provided by TrillaBit.
- Login with the user using the Login User API.
- Once logged in you will have your initial JWT returned.
- Use the JWT with the Create User API to add your users.
- When the user navigates to the page with the embedded iframe:
- Generate the JWT with all the appropriate fields.
- Sign the JWT using your secrey key.
- Set the iframe URL accordingly.
- The user should now be automatically logged into the TrillaBit Quick Intelligence platform.
Embedding the Full Platform
To embed the platform with the side menu you only need to specify the JWT.
The iframe URL should be set as follows:
<iframe src="https://qi.trillabit.com/?t={jwt_token}"/>
Dashboard Mode
To load the application directly into a dashboard, you must add an additional query string parameter. "dashboardID".
<iframe src="https://qi.trillabit.com/?t={jwt_token}&d={dashboardID}"/>
Dashboard ID's are obtained from the List My Dashboards API once you have created at least one dashboard under the user.
Iframe Token Refresh Integration Guide
Managing your JWT
To ensure that the QI platform is securely authenticating your application you will need to manage the JWT from your host application. This means that you will be generating and signing all JWT's that are set in the iframe. This allow your to control additional details like the expiry date of the JWT and other related parameters. Any settings that need to be sent to the client securely will be through the JWT.
This guide explains how to implement automatic JWT token refresh for the analytics dashboard when embedded in an iframe. When the analytics dashboard is embedded in your application via iframe, it can automatically handle expired JWT tokens by communicating with the parent application. This prevents users from being logged out and having to manually refresh their session.
How It Works
- Token Expiration: When a JWT token expires (API returns 401), the iframe sends a
TOKEN_EXPIREDmessage to the parent application - Token Refresh: Your parent application listens for this message and refreshes the token
- Token Update: Your application sends the new token back to the iframe via
TOKEN_UPDATEmessage - Automatic Retry: The iframe automatically retries all failed requests with the new token
- Timeout: If no token is received within 10 seconds, the iframe redirects to a session expired page
Message Protocol
TOKEN_EXPIRED (Iframe → Parent)
The iframe sends this message when the JWT token expires:
{
  type: 'TOKEN_EXPIRED',
  message: 'Token expired, please refresh',
  pendingRequests: 5  // Number of requests waiting for new token
}
TOKEN_UPDATE (Parent → Iframe)
Your parent application should respond with a new token:
{
  type: 'TOKEN_UPDATE',
  token: 'eyJhbGciOiJIUzI1NiIsInR5cCI6IkpXVCJ9...'  // New JWT token
}
Implementation
1. Listen for Token Expiration
In your parent application, add a message listener:
window.addEventListener('message', async (event) => {
    // Verify the message is from your iframe (security check)
    if (event.origin !== 'https://your-analytics-domain.com') {
        return;
    }

    // Check if this is a token expiration event
    if (event.data.type === 'TOKEN_EXPIRED') {
        console.log('Token expired, refreshing...', event.data.message);
        console.log(`${event.data.pendingRequests} requests are waiting`);

        // Refresh the token
        await handleTokenRefresh(event.source);
    }
});
2. Refresh the Token
Implement your token refresh logic:
async function handleTokenRefresh(iframeWindow) {
    try {
        // Call your backend to refresh the token
        const response = await fetch('https://your-api.com/auth/refresh', {
            method: 'POST',
            credentials: 'include', // Send refresh token cookie
            headers: {
                'Content-Type': 'application/json',
            },
        });

        if (!response.ok) {
            throw new Error('Token refresh failed');
        }

        const {token} = await response.json();

        // Send the new token back to the iframe
        iframeWindow.postMessage(
            {
                type: 'TOKEN_UPDATE',
                token: token,
            },
            'https://your-analytics-domain.com'
        ); // Specify target origin for security

        console.log('Token refreshed successfully');
    } catch (error) {
        console.error('Failed to refresh token:', error);
        // The iframe will automatically redirect to session expired after 10 seconds
    }
}
3. Embed the Iframe
<iframe id="analytics-iframe" src="https://your-analytics-domain.com/dashboard?t=INITIAL_TOKEN&d=DASHBOARD_ID" width="100%" height="800px" frameborder="0" allow="clipboard-write"></iframe>
Complete Example
// Parent application code
class AnalyticsDashboard {
    constructor(iframeId, analyticsOrigin) {
        this.iframe = document.getElementById(iframeId);
        this.analyticsOrigin = analyticsOrigin;
        this.setupMessageListener();
    }

    setupMessageListener() {
        window.addEventListener('message', async (event) => {
            // Security: verify origin
            if (event.origin !== this.analyticsOrigin) {
                return;
            }

            // Handle token expiration
            if (event.data.type === 'TOKEN_EXPIRED') {
                console.log(`Token expired. ${event.data.pendingRequests} requests pending.`);
                await this.refreshToken(event.source);
            }
        });
    }

    async refreshToken(iframeWindow) {
        try {
            // Your token refresh implementation
            const response = await fetch('/api/auth/refresh', {
                method: 'POST',
                credentials: 'include',
            });

            if (!response.ok) {
                throw new Error(`Token refresh failed: ${response.status}`);
            }

            const {token} = await response.json();

            // Send new token to iframe
            iframeWindow.postMessage(
                {
                    type: 'TOKEN_UPDATE',
                    token: token,
                },
                this.analyticsOrigin
            );

            console.log('Token refresh successful');
        } catch (error) {
            console.error('Token refresh error:', error);
            // Iframe will redirect to session expired after 10 seconds
        }
    }
}

// Initialize
const dashboard = new AnalyticsDashboard('analytics-iframe', 'https://your-analytics-domain.com');
Important Notes
Security
- Always verify
event.originbefore processing messages to prevent XSS attacks - Always specify target origin when using
postMessage()(never use'*') - Only send tokens over HTTPS connections
Timing
- The iframe waits 10 seconds maximum for a token refresh
- If no
TOKEN_UPDATEis received within 10 seconds, the iframe redirects to/sessionexpired - Multiple simultaneous requests share the same token refresh wait period
Error Handling
- If your token refresh fails (network error, invalid refresh token, etc.), the iframe will automatically handle the session expiration
- You don't need to send an error message back to the iframe
- Users will be redirected to the session expired page automatically
Single Notification
- Even if 50+ API calls fail simultaneously, you'll only receive ONE
TOKEN_EXPIREDmessage - The
pendingRequestsfield tells you how many requests are waiting - All pending requests will automatically retry once you send the
TOKEN_UPDATEmessage
Testing
To test your integration:
- Embed the iframe with a short-lived JWT token
- Wait for the token to expire (or modify your token to expire quickly)
- Verify that:
- You receive a
TOKEN_EXPIREDmessage - Your token refresh logic executes
- The
TOKEN_UPDATEmessage is sent back - The dashboard continues working without interruption
- You receive a
Troubleshooting
Iframe redirects to session expired immediately
- Check that you're listening for
TOKEN_EXPIREDmessages - Verify your
event.origincheck isn't blocking valid messages - Ensure you're responding within 10 seconds
Token refresh doesn't work
- Check browser console for CORS errors
- Verify the token format is correct (JWT string)
- Ensure the
TOKEN_UPDATEmessage structure matches the protocol - Check that
postMessage()target origin matches the iframe origin
Security warnings
- Make sure to validate
event.originbefore processing any messages - Always specify target origin in
postMessage(), never use'*'
Alternative: No Token Refresh
Since you are creating the token and can set the expiration time. You can simply proactively refresh the token if you wish by sending a TOKEN_UPDATE message and keep the session active. If you don't want to implement token refresh, simply don't listen for TOKEN_EXPIRED messages. The iframe will automatically redirect to the session expired page after 10 seconds when the token expires.
Signing the JWT
You will be provided the signing key for the JWT separately. This will be specific to your organization. You will also be provided the Domain Id and any Account Id's that are associated to your account.
JWT Token Format
This is the format of the JWT token that should be passed so that a user will be authenticated with the system. Details on how to pass it will be provided in a separate document.
Example JWT payload
{
    "sub": "[email protected]",
    "scopes": ["ACCOUNT_ADMIN", "DOMAIN_ADMIN", "REGULAR"],
    "dmn": "aac5bbd0-15b8-11ee-be56-0242ac120002",
    "uid": "aa0ede86-15b8-11ee-be56-0242ac120002",
    "aid": "aaf652e2-15b8-11ee-be56-0242ac120002",
    "mid": "aaa57ff0-15ba-11ee-be56-0242ac120002",
    "amid": "aab1673a-15ba-11ee-be56-0242ac120002",
    "iss": "TrillaBit",
    "iat": 1636893574,
    "exp": 1636897174,
    "filterAttribute": "[{\"attribute\": \"store_id\",\"value1\": \"1|2|3\",\"operator\": \"contains\"}]",
    "readOnlyDashboard": true
}
TrillaBit Specific JWT Attributes
The following are TrillaBit specific attributes:
- "dmn" → Domain Id
- "aid" → Account Id
- "uid" → User Id
- "mid" → Membership Id
- "amid" → Account Member Id
- "readOnlyDashboard" → Determines whether the dashboard that is loaded will be read only if true. Note: This has to be used in combination with the dashboardID query string parameter.
- "filteringAttribute" → Used to apply row-level security through filtering of additional attributes within your dataset's organization key. e.g. the example assumes you are segmenting your sales dataset by department and within each department you want to secure your data at the store level as well. NOTE: This field should be a string and not a json array object.
The other attributes are from the JWT standard. When you create or add a user, these Id’s will be returned to you. Of course, DomainId and AccountId are known in advance since you add the user to that domain and account.
The "iss" attribute needs to be changed accordingly.(Company name is preferred)
Domain refers to Client, and Account refers to Sub-client.
Styling your iframe
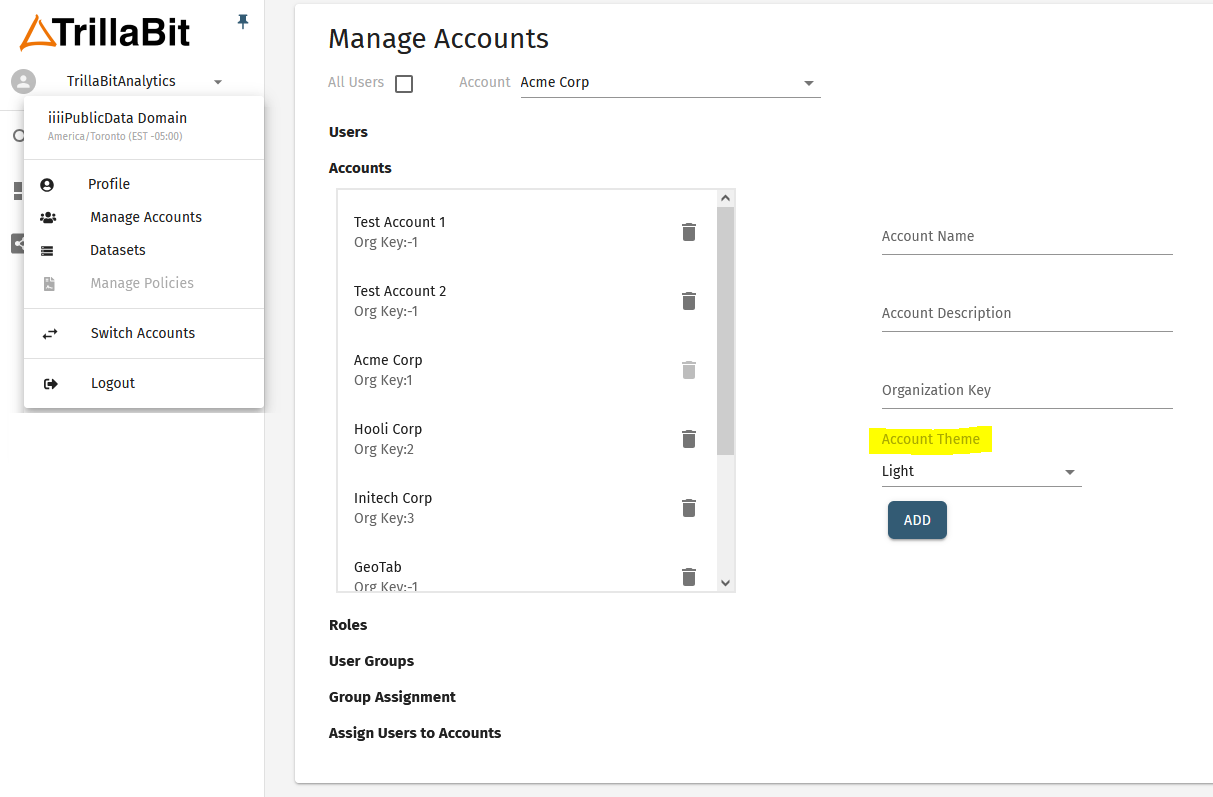
You have control on how your iframe is embedded. There are a number of properties and styling you can set. To provide a more seamless experience we would suggest adding a loading animation or hide the iframe until it has finished loading. The theme for the QI application itself can be configured from within the platform at the account-level. We currently have themes for light/dark modes to accomodate most setups. You can find the available themes under the top-left menu -> Manage Accounts -> Accounts tab.
Login APIs
Login User
Method: POST
API Path: api.trillabit.com:8000/login
Headers
'Content-Type': 'application/json'
'X-Requested-With': 'XMLHttpRequest'
Request
{
    "userName": "[email protected]",
    "password": "complexPassword!"
}
Response
{
    "token": "eyadfgadf...",
    "refreshToken": "eyzsfgadf..."
}
User APIs
Create User
Method: POST
API Path: api.trillabit.com:8000/api/analytics/external/accountID/users/user
- Domain Id → from JWT token
- Account Id → The accountID that we need to create user under that account
The user will be created under the domain and account that matches with info from the JWT token.
Fields
- userName → should be a valid email address associated with the user
- firstName
- lastName
- accountPhone (Optional)
- userID (Optional) : UUID → in case you want to use the userId from your system; otherwise, don’t pass it.
- roles: [ “Role1” , “Role2” ] → can be existing or new roles
Request
{
    "userID": "e20ede86-15b8-11ee-be56-0242ac120002",
    "userName": "[email protected]",
    "firstName": "John",
    "lastName": "Smith",
    "accountPhone": "321-321-3211",
    "roles": ["Role1", "Role2"]
}
Response
{
    "accountID": "fcf652e2-15b8-11ee-be56-0242ac120002",
    "accountMemberID": "",
    "membershipID": "",
    "userID": "e20ede86-15b8-11ee-be56-0242ac120002",
    "domainID": "b8c5bbd0-15b8-11ee-be56-0242ac120002"
}
Update User
Method: PUT
API Path: api.trillabit.com:8000/api/analytics/external/accountID/users/user/userID
Request
{
    "firstName": "First_name",
    "lastName": "Last_name",
    "accountPhone": "321-321-3211",
    "roles": ["Role3", "Role2"]
}
Response
HTTP 200 OK
Remove User from Account
Method: DELETE
API Path: api.trillabit.com:8000/api/analytics/external/accountID/users/user/userId
Request
(No request body needed)
Response
HTTP 200 OK
List Users
List of users info for the account specified in the URL
Method: GET
API Path: api.trillabit.com:8000/api/analytics/external/accountID/users
Request
(No request body needed)
Response
[
    {
        "domainID": "b8c5bbd0-15b8-11ee-be56-0242ac120002",
        "accountID": "fcf652e2-15b8-11ee-be56-0242ac120002",
        "userID": "e20ede86-15b8-11ee-be56-0242ac120002",
        "membershipID": "ef511428-15b9-11ee-be56-0242ac120002",
        "accountMemberID": "f735ebf0-15b9-11ee-be56-0242ac120002",
        "userName": "[email protected]",
        "firstName": "John",
        "lastName": "Smith",
        "accountPhone": "234-1111-376",
        "roles": [
            {
                "roleID": "fd1bdc14-15b9-11ee-be56-0242ac120002",
                "roleName": "REGULAR",
                "roleDescription": "REGULAR"
            }
        ]
    }
]
Account APIs
Create Account
Method: POST
API Path: api.trillabit.com:8000/api/analytics/external/account
Request
{
    "accountName": "new_account",
    "accountDescription": "new_account_desc",
    "organizationKeyValue": "200"
}
Response
HTTP 200 OK
{
    "accountID": "fcf652e2-15b8-11ee-be56-0242ac120002"
}
Read Account
Method: GET
API Path: api.trillabit.com:8000/api/analytics/external/account/accountID
Request
(No request body needed)
Response
HTTP 200 OK
{
    "accountID": "fcf652e2-15b8-11ee-be56-0242ac120002",
    "accountName": "new_account_updated",
    "accountDescription": "new_account_updated",
    "organizationKeyValue": "-1"
}
Update Account
Method: PUT
API Path: api.trillabit.com:8000/api/analytics/external/account/accountID
Request
{
    "accountName": "new_account_updated",
    "accountDescription": "new_account_desc_upduated",
    "organizationKeyValue": "200"
}
Response
HTTP 200 OK
Delete Account
Method: DELETE
API Path: api.trillabit.com:8000/api/analytics/external/account/accountID
Request
(No request body needed)
Response
HTTP 200 OK
List Accounts
Method: GET
API Path: api.trillabit.com:8000/api/analytics/external/account
Request
(No request body needed)
Response
HTTP 200 OK
[
    {
        "accountID": "fcf652e2-15b8-11ee-be56-0242ac120002",
        "accountName": "new_account_updated",
        "accountDescription": "new_account_updated",
        "organizationKeyValue": "-1"
    }
]
Dashboard APIs
Share Dashboard with User
Method: POST
API Path: api.trillabit.com:8000/api/analytics/external/UserSharedDashboard
Request
{
    "userID": "e20ede86-15b8-11ee-be56-0242ac120002",
    "dashboardID": "1d230a92-15b9-11ee-be56-0242ac120002"
}
Response
HTTP 200 OK
{
    "userSharedDashboardID": "d64eb3f0-15b8-11ee-be56-0242ac120002"
}
Unshare Dashboard
Method: DELETE
API Path: api.trillabit.com:8000/api/analytics/external/UserSharedDashboard
Request
(No request body needed)
Response
HTTP 200 OK
List My Dashboards
Get the list of dashboards shared with you.
Method: GET
API Path: api.trillabit.com:8000/api/analytics/external/UserSharedDashboard/SharedWithMe
Request
(No request body needed)
Response
HTTP 200 OK
[
    {
        "userSharedDashboardID": "d64eb3f0-15b8-11ee-be56-0242ac120002",
        "accountID": "fcf652e2-15b8-11ee-be56-0242ac120002",
        "dashboardID": "1d230a92-15b9-11ee-be56-0242ac120002",
        "user": null,
        "dashboard": {
            "dashboardName": "My Dashboard",
            "dashboardDescription": "My Dashboard"
        }
    }
]